Transform maintenance needs, service requests, or faults into clear, trackable assignments for your internal technicians or external vendors.
By logging every task here, you ensure that no job falls through the cracks and every repair becomes a permanent part of your building's operational history.
Step-by-Step: Creating a Work Order
Step 1: Initiate the Work Order
Tap the "+" icon on the app's bottom bar and select Work Order.
Step 2: Enter Work Order Details
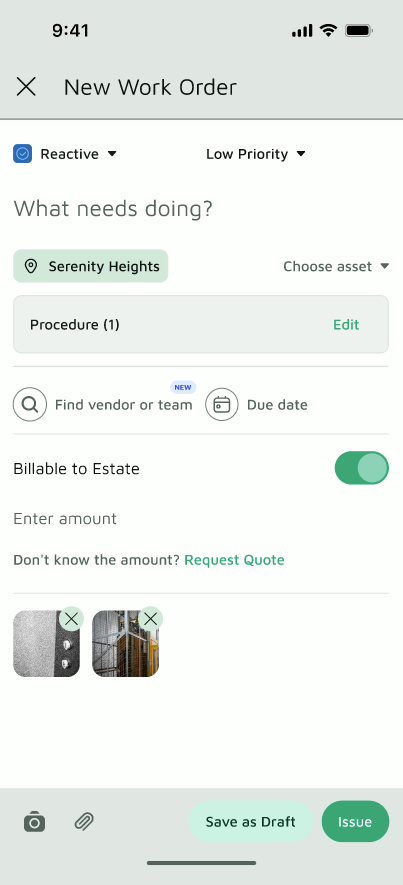
- Title (Required): Give it a concise, actionable name (e.g., Leaky Faucet in Unit 4B). Use the comments section later for extra notes.
- Work Type: Choose the kind of job this is. It defaults to Reactive, so you only need to change it when the work is something other than an unplanned fix.
- Priority: Set how urgent the job is. It defaults to Low. Raise it when the issue affects safety, access, or residents' day-to-day comfort, so the assignee knows what to tackle first.
- Location & Asset: Select the specific location. If you don't choose one, the work order is automatically placed under the Estate's default location, which uses the address set for your Estate. If the job involves a specific piece of machinery (like a pump or chiller), link the Asset too. This automatically pins the work order to that asset's lifelong "medical record."
- Assigned To: Select the internal technician or external vendor organization responsible for the fix.
- Procedure: A procedure is made up of forms. It defines the steps you want the assignee to follow to complete the job. Every work order includes the system procedure, which consists of:
- Clock In (GPS verified): The assignee must clock in on-site, confirming they're at the location.
- Completion Record: A form the assignee fills in to document the finished work.
- Billing / Cost: If there is a cost involved, select Billable to Estate to ensure it routes through your financial approval workflows and tracks against your budget.
- Due Date: Set a deadline if the task is time-sensitive.
- Attachments: Take or upload a photo of the issue. Visual context saves hours of back-and-forth communication.
What Happens Next?
Once a work order is issued, it moves from a simple ticket into an active, tracked deployment:
-
Instant Dispatch: The assigned technician or vendor receives an immediate mobile alert with all the locations, asset details, and photo attachments.
-
Real-Time Tracking: You can watch the progress live on your dashboard as the technician updates their status from Enroute to In Progress, and finally to Completed.
-
On-Site Verification: When the technician arrives and completes the job, their mobile app captures the exact timestamps and GPS-verified data, giving you absolute proof that the work was done right on the premises.
-
Centralized Collaboration: Anyone on the team can drop comments, upload follow-up photos, or log unexpected expenses directly inside the work order thread.
Want to learn how to set up automated recurring schedules for preventive maintenance?
